
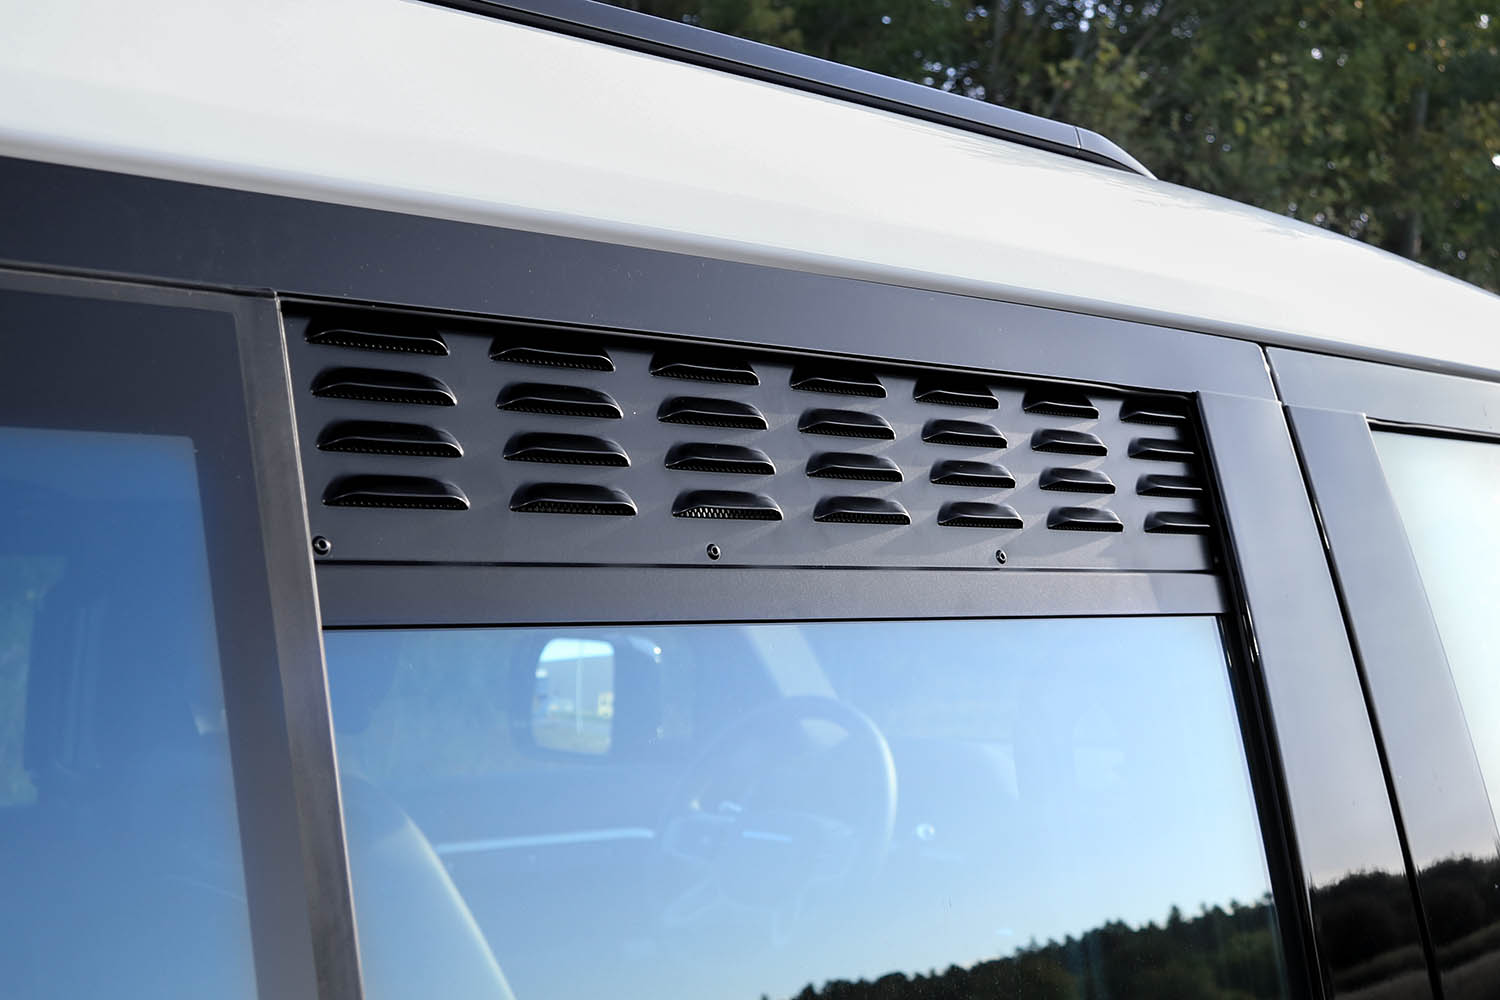
Window vents Land Rover New Defender, from model year 2020 - rear



€109.00
Prices incl. VAT; / Parcel shipping
Available from stock - delivery time 1-3 working days
Description
Nakatanenga window vents / ventilation grilles for the rear side windows of the Land Rover New Defender, from model year 2020
The new Defender combines modern technology with proven off-road capability. Good air circulation as if the windows were slightly open, but without the risk of rainwater or theft? Plus effective protection against insects? That's what our ventilation panels with mosquito nets offer, made to fit the New Defender perfectly from high-quality aluminum—no wobbly universal parts. Supplied in pairs and powder-coated in black, they complement the modern design discreetly and sensibly, especially when camping or on expeditions.
Installation is straightforward: roll down the window, insert the ventilation panel, close the window again – and it sits securely and rattle-free.
⚠️ Important note: Children and animals must never be left in the vehicle at high temperatures, even with the ventilation panels in place.

Suitable for Defenders built from 2020 onwards.
Length: 550 mm
Nakatanenga window vents / ventilation grilles for the rear side windows of the Land Rover New Defender, from model year 2020
The new Defender combines modern technology with proven off-road capability. Good air circulation as if the windows were slightly open, but without the risk of rainwater or theft? Plus effective protection against insects? That's what our ventilation panels with mosquito nets offer, made to fit the New Defender perfectly from high-quality aluminum—no wobbly universal parts. Supplied in pairs and powder-coated in black, they complement the modern design discreetly and sensibly, especially when camping or on expeditions.
Installation is straightforward: roll down the window, insert the ventilation panel, close the window again – and it sits securely and rattle-free.
⚠️ Important note: Children and animals must never be left in the vehicle at high temperatures, even with the ventilation panels in place.
Suitable for Defenders built from 2020 onwards.
Length: 550 mm
YouTube
Ludwig-Erhard-Ring 30
92348 Berg b. Neumarkt i.d.OPf.
Deutschland / Germany
E-Mail / Email: info@nakatanenga.de
Customers also bought

Flat Rate Installation fee for fitting a warm air duct pass-through to window ventilation panels – Various Models A warm air duct pass-through in your window ventilation panel lets you direct warm air where you need it: from a portable heater box into the vehicle interior or from a permanently installed air heater to your roof tent. We modify the ventilation panel and fit the pass-through for you. Neither you nor your vehicle needs to visit us: you can order a new ventilation panel with the modification already completed or send us your existing panel. Alternatively, you can drop it off in person. Option 1: Order a New Ventilation Panel Together with the Fitting Service (Recommended Option) Order the appropriate ventilation panel and this fitting service together from our shop. Use the comments field when placing your order to specify exactly where you would like the warm air duct pass-through fitted in the panel. We modify the panel to your instructions and send you the finished ventilation panel with the pass-through fitted within 2–3 days. There is no need to visit us or arrange an appointment. Option 2: Send Us Your Existing Ventilation Panel for Modification Already have a suitable ventilation panel? Order the fitting service online and send us your panel, quoting your order number, to Nakatanenga 4x4-Equipment GmbH & Co. KG, Ludwig-Erhard-Ring 30, 92348 Berg bei Neumarkt, Germany. Describe the required position of the pass-through in the comments field when placing your order, or mark it clearly on the panel. We fit the warm air duct pass-through and return the modified panel to you. No workshop appointment is required, and you do not need to bring your vehicle to us. Option 3: Drop Off Your Existing Ventilation Panel in Person Alternatively, you can drop off your existing ventilation panel at our premises. Please call us in advance on +49 9181 466 644 to arrange your visit. Depending on our workload, you may be able to take the finished panel away straight away or collect it after 1–2 days. Our workshop is located in 92348 Berg bei Neumarkt in the Upper Palatinate, Bavaria, near Nuremberg and Regensburg. The vehicle itself is not required for the panel modification. What the Service Includes Modification of the agreed ventilation panel at the required fitting position Fitting the warm air duct pass-through The required plastic pass-through fitting Price and Additional Components Required The modification and fitting are carried out at the stated flat rate fee, including the required plastic pass-through fitting. The ventilation panel and any additional heating accessories must be purchased separately. Depending on whether you want to direct warm air from a portable heater box into the vehicle or from a permanently installed air heater to your roof tent, you will need suitable components for your heating setup: Window ventilation panels for various vehicle models as the basis for fitting the warm air duct pass-through Waluflex warm air ducting to direct the warm air Matching end fitting for Waluflex warm air ducting Heaters for permanent installation for a heating solution permanently fitted in the vehicle Portable heater boxes to supply warm air from outside the vehicle Supported Vehicle Models The fitting service is available for various vehicle models with a suitable ventilation panel. Compatibility depends on the panel version used. When placing your order, please therefore provide the vehicle model, year of manufacture and product number of your existing panel or the panel you are ordering. Please note: If suitable ventilation panels are not currently available for your vehicle, you can tell us your vehicle model here; we will take this into account when developing new ventilation panels in the future. Requirements and Important Information Clearly specify the required fitting position in the comments field when placing your order. If you are sending us a panel, you can also mark the position directly on it. Please provide a telephone number in case we need to clarify any details. An appointment is only required if you are dropping off the panel in person. Any fitted wind deflectors may need to be removed before the modified panel can be used. On the adjustable universal ventilation panel, the pass-through can only be fitted when the panel is extended to its maximum length. The ventilation panel is individually modified to accommodate the pass-through. Please finalise the required position before the work begins.
Prices incl. VAT;

Sun visors in your car offer few functions beyond the obvious: make-up mirrors for female passengers, maybe, or flimsy card holders for permits, IDs and similar items. We’ve been offering our popular and very successful universal visor organizers for quite some time now and they are the perfect solution to stack the humble visors with additional functions. If you are looking for great, custom-made organizers for both visors in a New Defender, look no further. Simply slip them on, fasten the Velcro straps, done! MOLLE mesh enables you to attach any MOLLE cases or similar compatible accessories. The bands can also hold sun glasses, pens or small flashlights. Two zipper pouches are perfect for all smaller items that are easily lost: coins, keys, remotes, swipe cards and a lot more. A great place to keep your vehicle documents, parking permits etc. is the dedicated slot on the side of the visor. And to top it all off, our textile studio has worked a lot of Velcro fleece into the organizer so that you can attach all kinds of smaller items. The trusted Nakatanenga sun visor organizer is tidy, versatile and allows for quick access to everything that’s important inside a New Defender! Available in the colors black, gray and coyote. Delivery in pairs for driver and passenger side.
Prices incl. VAT;

Dashboard bag for Land Rover NEW DEFENDER from BJ 2020, LHD The open dashboard design in the New Defender is no coincidence, of course. This is where the impeccably modern cockpit by design director Gerry McGovern and colleagues pays homage to the interior of the classic Defender, the original Landy. Good for us, because we immediately spotted an opportunity to improve storage capabilities: with our nifty dashboard bag for the New Defender. The open dashboard shelf is where you put all the odds and ends in your car. It was like that in the old Landy, it will probably be the same in the new one. But once you’re testing the L663’s tilt angle or maximum gradient, our new dashboard bag, made from easy-to-clean, robust nylon, will keep your stuff from actually flying around. Installing the bag firmly in the dash takes only a few minutes. The zipper has two sliders so that the bag can be opened and shut from both sides. On the inside, mesh compartments and Velcro fleece allow for organized and secure storage of all kinds of items. The front features MOLLE fleece to attach patches and other little things. Since the New Landy sports a designer cockpit, we used transparent plastic material on top of the bag. This allows for the ambient LEDs in the dashboard and the day light from the opening above to filter through into the bag’s interior. The dashboard bag comes in New Landy compatible colors black, gray and coyote. Installation does NOT require drilling, glueing or other damaging methods. It is completely reversible. We include a detailed installation guide. LHD
Prices incl. VAT;

Coupling rod/ Rods for height adjustment Installing lift kits for 4x4’s usually requires complex (and expensive) modifications. Not so if your vehicle comes with a self-regulating air suspension, like the New Defender. Raising the ride height of the New Landy by 1 or 1,6 inches takes very little in terms of effort or budget. The principle is very simple and has been employed with Discovery 5 and Range Rover Sport models for quite some time. Simply replace the original rods on all four wheel suspensions with our replacements. The new rod’s different dimensions will trick the self-regulating suspension to permanently lift the ride by 1” or 1,6”, respectively, in all drive modes. Once the new lift rods are installed, the vehicle’s sensor system will adjust itself automatically to the new ride height after the first restarting of your car. Resetting the ride to original factory settings is just as easy and only a question of minutes. We produce these 1“ and 1,6“ lift rods for the New Defender in our own workshop. The rods are laser machined from extremely robust high-quality plastics and the bushings are created in an additive process. This makes both components highly resistant to degradation by weather or chemicals, like fuel, oils etc. The custom-designed bushings are flexible and extend to both sides of the rods’ connections. In terms of quality, this is a far superior solution over many other products on the market, specifically aluminum rods with cheap off-the-shelf cable grommets. Available as +1“ or + 1,6“. Caution: these products are without part certification and are not road legal. They¬¬ may not be used on public roads.
Prices incl. VAT;

Bumper protection in different colours What’s worse than a scratch on your car? Clearly that very first scratch! How annoying is it when you spot one on a pristine new vehicle? Even when 4x4s generally wear their scars with pride, most signs of heavy usage aren’t necessary, they’re frustrating and also depreciate the value of your vehicle. One of the first areas to show signs of wear and tear – especially with off-road vehicles – is usually the cargo area. But if your 4x4 is a New Defender, would you really want to see a worn and scratched rear bumper? Immediate and long-lasting prevention of wear marks on your New Defender’s rear bumper can be achieved with our designated paint protection film. This high-performance product by industry leader 3M protects your New Defender’s rear bumper from scratches and abrasion even when your loading area is constantly in use for work or sports. And don’t forget the damage a dog’s claws can do to the paint when you carry them regularly in a dog box in the back. Due to its multi-layer structure, the 3M wrap also protects the bumper from chipping caused by the impact of small stones or dropped objects. Installing the paint protection film is really easy. Everything you need is included: cleaning cloth, adhesion promoter wipe, squeegee and detailed instructions. If you’ve never done this before: don’t worry. The protective wrap can be positioned exactly as you need it, but if you have to readjust the position a few millimeters that’s no problem either. Simply slide the film into place. It only starts to adhere once you apply pressure with the squeegee. The protective wrap is available in black, matt black, anthracite grey or silver, making it a perfect visual match for any New Defender color scheme. Comes in one complete „no worries“ kit: foil, squeegee, cleaner, primer. Available in Black, Matt Black, Anthracite, Silver or Matt Transparent*, the protective film perfectly matches the look of the new Defender, regardless of its paint finish or colour scheme. Please note:The transparent version differs from the other versions in terms of price and workmanship, as it uses a specially developed, UV-stabilised film. This film is specifically designed to minimise material yellowing caused by UV radiation and ensure long-term visual stability.The transparent film MUST be applied wet! For professional application, we provide detailed installation instructions and the necessary processing materials. Instructions for wet application: Fill a spray bottle with water and 1–2 drops of washing-up liquid (or mounting/application solution). Remove coarse dirt from the loading sill with a damp cloth and then clean thoroughly with the enclosed cleaning cloth – the surface must be clean and dust-free. Spray the loading sill evenly. Remove the protective film from the film and also spray the adhesive side lightly (so that it does not stick immediately). Apply the film and align it carefully. The moisture allows it to be moved around. Squeegee out the water, working from the centre outwards. Apply even pressure to remove the water and air bubbles. Remove any excess liquid with a cloth. The film is fixed after squeegeeing, but only reaches its final adhesion after 24–48 hours. During this time: Do not wash, do not use a high-pressure cleaner. Keep as dry as possible and avoid mechanical stress.
Prices incl. VAT;
